Official Luthiers Forum! http://www-.luthiersforum.com/forum/ |
|
Spyro rosette de-mystified http://www-.luthiersforum.com/forum/viewtopic.php?f=10102&t=4934 |
Page 1 of 1 |
Author: | Steve Kinnaird [ Mon Feb 06, 2006 5:53 am ] |
Post subject: | |
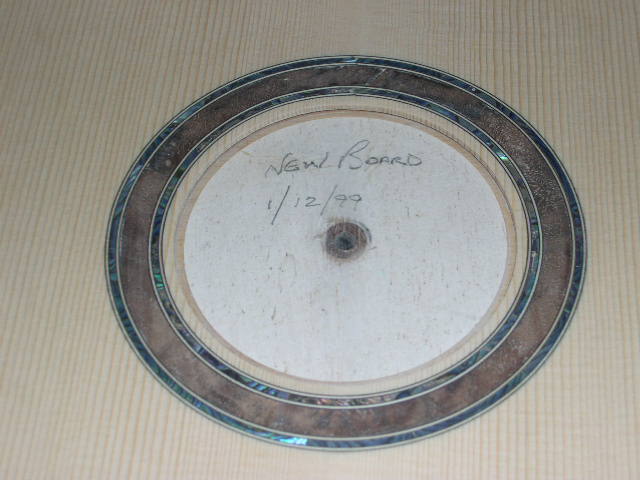
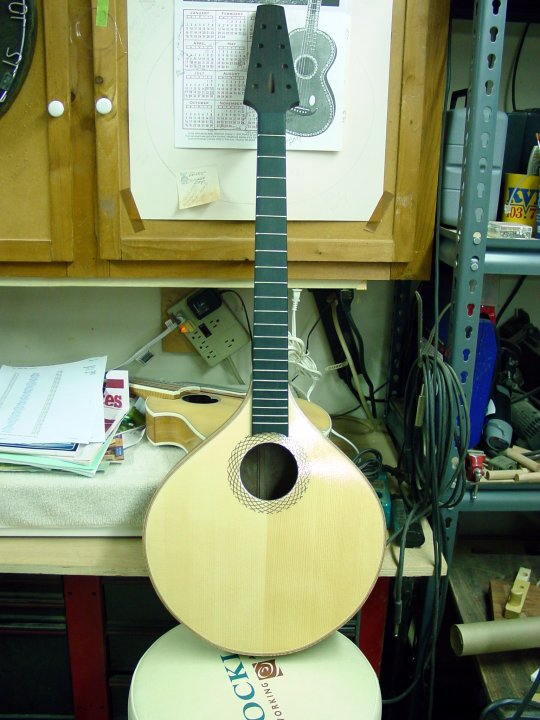
Several asked how Dan Fobert accomplished his spyrograph-looking rosette that was pictured a couple of weeks ago. I was looking at the LINT site and saw that Dan had done a pictorial of this very thing. It is indeed a spyrograph approach, and each of the lines is inlaid, not drawn. Here's the finished rosette: ![]() 
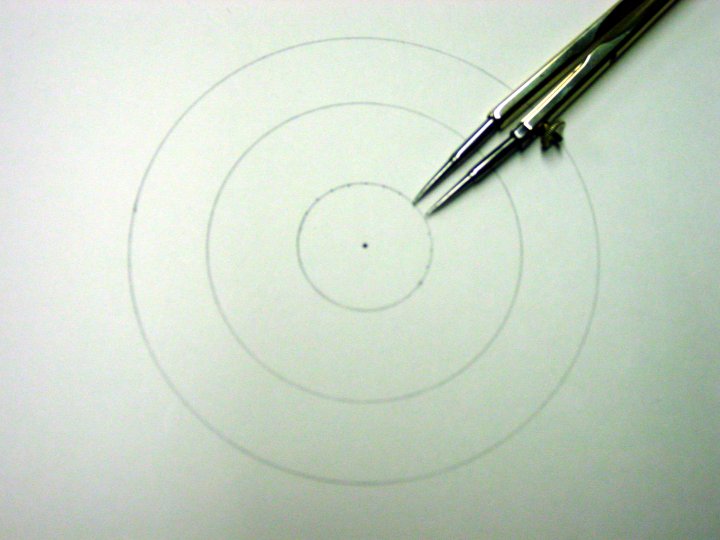
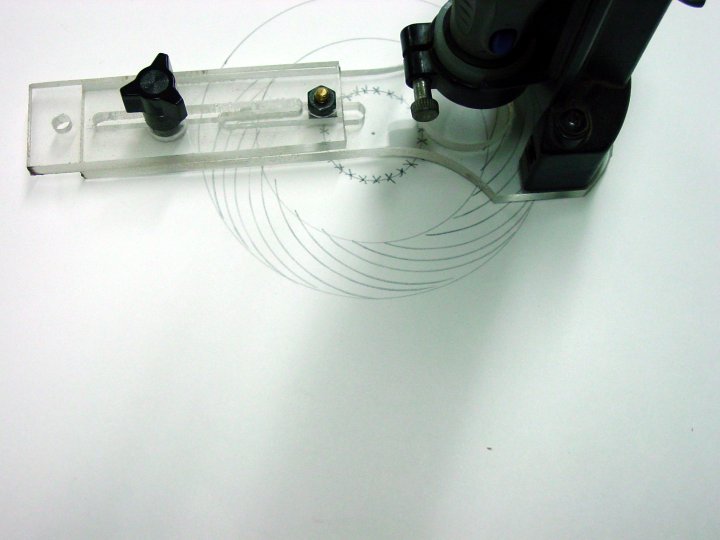
He starts by drawing concentric circles that define the inner and outer parameters of the rosette. Note the 1" inner circle with the pivot points drawn in at 4mm intervals: ![]() 
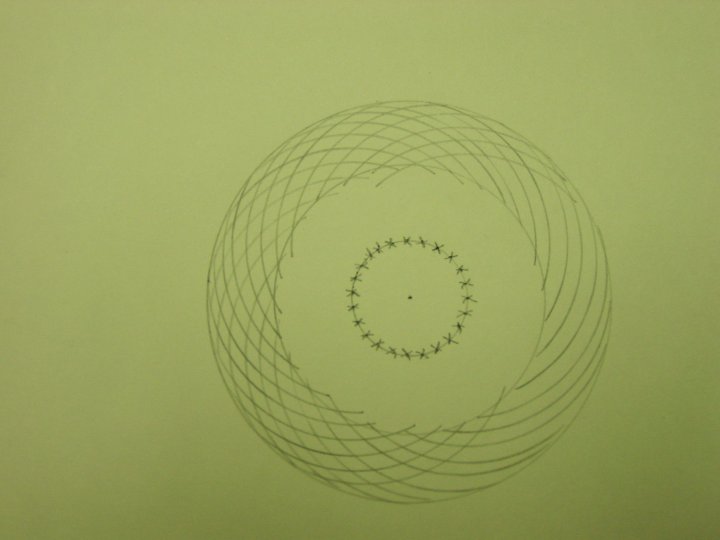
Next is a drawing-in of the router path based on those points, which shows what the finished rosette will look like: ![]() 
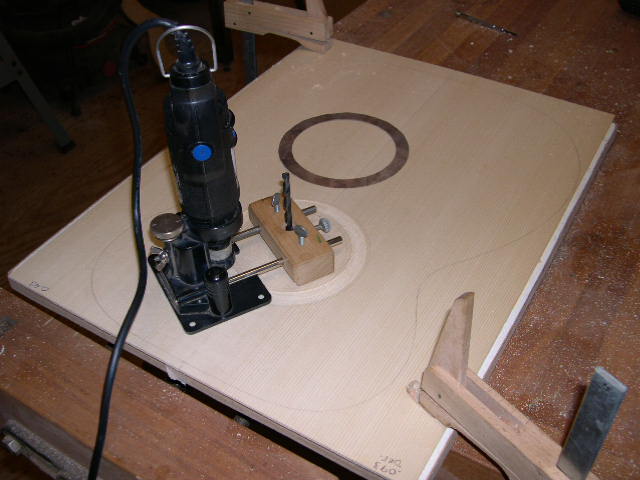
And finally the routing: ![]() Dan said that you could easily rout an outer circle to further define the outer circumfrence of the rosette, and tie up any "loose ends". That might give a little cleaner look, but then you might loose some of the spyrograph effect. He did use an inner band, which hides the backing glued to the underside of the top. Here's a shot of the finished instrument, an Irish bouzouki: ![]() Hope you enjoy this, and if you try one, let Dan know you appreciate his sharing this info. Steve |
Author: | Robbie O'Brien [ Mon Feb 06, 2006 6:05 am ] |
Post subject: | |
Cool! Thanks for sharing! |
Author: | Brock Poling [ Mon Feb 06, 2006 7:45 am ] |
Post subject: | |
Very clever. Thanks for posting this. :-) |
Author: | BruceH [ Mon Feb 06, 2006 8:55 am ] |
Post subject: | |
Ditto. Thanks! I'll have to give that a shot sometime. |
Author: | crowduck [ Mon Feb 06, 2006 10:55 am ] |
Post subject: | |
Beautiful! How clever. Has me wondering if, instead of inlaying the routed lines, I could fill them with something like contrasting colored Plastic Wood, or wood putty, then level sand? Anyone ever tried anything like that? I wonder if those products shrink back or bleed? Guess I'll have to try some experiments on scrap. CrowDuck |
Author: | tl507362 [ Mon Feb 06, 2006 11:18 am ] |
Post subject: | |
Very cool! Thanks Steve. Can I try it on my upcoming Bouzouki project? I think I would add inner and outer purfling lines. Also I noticed that they were using a custom circle cutting jig, I'm wondering if the Stew-mac circle cutting jig can handle this small of a radius. Also, you would have to drill many holes 3/16" in size for the stew mac jig to work. Maybe I could put the lines further apart then it might work. Guess I'll have to experiment. By the way, what are the lines inlaid with? Do you think wood dust and glue would work? Tracy |
Author: | Alain Desforges [ Mon Feb 06, 2006 11:49 am ] |
Post subject: | |
Thank you very much Steve. Now I'll have to try it ![]() |
Author: | Michael Dale Payne [ Mon Feb 06, 2006 1:08 pm ] |
Post subject: | |
[QUOTE=crowduck] Beautiful! How clever. Has me wondering if, instead of inlaying the routed lines, I could fill them with something like contrasting colored Plastic Wood, or wood putty, then level sand? Anyone ever tried anything like that? I wonder if those products shrink back or bleed? Guess I'll have to try some experiments on scrap. CrowDuck[/QUOTE] Yes but srinkage and expansion of wood vs non wood products can become an issue on soft woods. As compaired to two wood products will srink and expand pretty much togather I did somthing like this on a coffee table many moon ago. I had this clever idea to use a poured epoxy resin as the media. It looked great for about a year ![]() |
Author: | crowduck [ Mon Feb 06, 2006 2:06 pm ] |
Post subject: | |
Michael, Yes, I am concerned about the issues you mention. The product I'm looking at is "Plastic Wood", made by Dap. It's solids content(filler) is reported to be 58% wood fiber or cellulose fiber, and is available in a range of colors. I'm hoping that this will be more compatable with softwoods characteristics, shrinkage/expansion. Here's some info about the product from dap.com: Physical & Chemical Characteristics: Consistency: Stiff Dough Base: Nitrocellulose Volatile: Acetone, Isopropanol and n-Butyl Acetate Filler: Wood Fiber or Cellulose Fiber Odor: Ketone/Alcohol (or strong solvent) Solids: 58% by weight Shelf Life: 1 Years Minimum Drying Time: 1 to 2 hours in shallow fills up to 1/8”; Up to 24 hours in fills 1/4” and over. CrowDuck |
Author: | Steve Kinnaird [ Mon Feb 06, 2006 2:27 pm ] |
Post subject: | |
[QUOTE=tl507362] Very cool! Thanks Steve. Can I try it on my upcoming Bouzouki project? [/QUOTE] I don't see why not, Tracy. It worked for Dan, and I don't think he's patented this yet! [QUOTE=t1507362] By the way, what are the lines inlaid with? Do you think wood dust and glue would work? [/QUOTE] Dan inlaid wood into all those grooves. And by the way, he cut all the arcs in one direction first, inlaid those, then when they were dry and leveled, he reversed direction to get the crisscross effect. Would wood dust and glue work? I think Michael raised some useful cautions--but remember all those baroque guitars that had a rosette of pearl pieces set into a black goo of some sort? Those lasted quite a long time! Steve |
Author: | Mark Swanson [ Mon Feb 06, 2006 4:40 pm ] |
Post subject: | |
Thanks Steve for posting this, it's very cool! I want to add it to my bag of tricks. |
Author: | Michael Dale Payne [ Tue Feb 07, 2006 3:21 am ] |
Post subject: | |
[QUOTE=crowduck] Michael, Yes, I am concerned about the issues you mention. The product I'm looking at is "Plastic Wood", made by Dap. It's solids content(filler) is reported to be 58% wood fiber or cellulose fiber, and is available in a range of colors. I'm hoping that this will be more compatable with softwoods characteristics, shrinkage/expansion. Here's some info about the product from dap.com: Physical & Chemical Characteristics: Consistency: Stiff Dough Base: Nitrocellulose Volatile: Acetone, Isopropanol and n-Butyl Acetate Filler: Wood Fiber or Cellulose Fiber Odor: Ketone/Alcohol (or strong solvent) Solids: 58% by weight Shelf Life: 1 Years Minimum Drying Time: 1 to 2 hours in shallow fills up to 1/8”; Up to 24 hours in fills 1/4” and over. CrowDuck[/QUOTE] give it a try on a pratice board, put it in the oven at 120 deg for 5-10 min let it cool, hydrate it with a mister let it dry over night and repeat, say four time. That shoud give you an idea if it will work. |
Author: | John Kinnaird [ Tue Feb 07, 2006 4:10 am ] |
Post subject: | |
Well Done bro. I am so on this. ![]() |
Author: | ggdelazzer [ Tue Feb 07, 2006 4:39 am ] |
Post subject: | |
Interesting solution, I'll try too. Anything else on this kind of rosette? Luigi |
Author: | Steve Kinnaird [ Tue Feb 07, 2006 6:55 am ] |
Post subject: | |
Luigi, do you mean is there any more information on this kind of rosette? I don't know. But it occurs to me that one could vary the spacing of those rotation points, or the diameter of that innermost circle, etc. etc., and get any number of different looks. It would be sort of fun to get out some paper and a compass (the artist's kind, not the mariner's kind) and start sketching some future rosettes. Steve |
Author: | Mattia Valente [ Tue Feb 07, 2006 7:59 am ] |
Post subject: | |
Great! This is giving me all kinds of new ideas. Time to go play with a piece of paper and a compass! |
Author: | crowduck [ Tue Feb 07, 2006 12:19 pm ] |
Post subject: | |
To use the StewMac circle cutting rig I'd think a special pivot would need to be make. Reading the original article at ling.org the author points out, "Because of the closeness of the pivot points, a rose cutter was made with a pin-point pivot and adjusted to 1? inches between the pivot and the cutter." I believe the StewMac pivot is 3/16". Now, I'm trying to figure a slick way to get a pin-point in the center of a 3/16" pivot. Maybe a 3/16" hardwood dowel, drilled accept a metal pin. Hmmm, sounds kind of dicey. Or perhaps, take a metal pin and slide it inside some brass tubing. Any slick ideas on how to make a pin-point pivot for the StewMac rig? I'm sure lots of us have them. CrowDuck |
Author: | crowduck [ Tue Feb 07, 2006 1:39 pm ] |
Post subject: | |
I 'may have' answered my own question. Got to thinking about 'common objects' with pins, right away thought of 'push pins', used for pinning stuff to corkboards and such. Turns out the ones I have in my desk drawer have a plastic head that has an approx. 3/16" diam. shaft. There is a molded collar at each end of the plastic head that has to be removed. Only remaining problem is length. Maybe epoxy the trimmed down push pin to the end of a 3/16" dowl. Guess it's time for a trip to Staples to look at push pins. My other idea is to take brass tubing in diminishing diameters, one inside the other, starting with 3/16", until I can get one in the center with a compass needle inside. Trip to the hobby store for this one. CrowDuck |
Author: | Steve Kinnaird [ Tue Feb 07, 2006 3:31 pm ] |
Post subject: | |
CrowDuck (now that's an interesting handle...), My circle cutting rig uses a rosewood plug, glued into my "rosette board", which is drilled out to accept the metal pivot point. Admittedly mine is 1/4", but I don't see why something finer wouldn't work. Here's the rig in operation-- the rosewood plug is buried under the top that is being routed, the maple holding block locks onto the 1/4" rod (ok, drill bit), and it's the drill bit that actually turns inside the rosewood. The only "slop" I get from this set up is the bearings in the Dremel. But that's another post.... ![]() Here's that plug: ![]() Again, why couldn't you simply drill a finer hole--than I did here--for your pivot? It might work! Steve |
Author: | crowduck [ Tue Feb 07, 2006 7:01 pm ] |
Post subject: | |
Steve, Thanks for the input, and nice looking jig. I guess the point of my meandering posts is 'how to use the StewMac rosette cutter' to cut that spirograph. Reading the original article at lint.org, the author specifically notes the necessity of a 'pin-point pivot, because the index marks on the inner circle are only 4mm apart. The StewMac pivot post is 3/16" od diam, and its bushing is also 3/16" id. 3/16" in. is roughly 4mm, so I don't see how how the 'stock StewMac' cutter could work without modification. So, what I'm really attempting to do is make a pin-point pivot that will fit in the 3/16" StewMac cutter bushing. I guess another approach might be to fabricate a new slider arm for the StewMac rig out of plexi or lexan, and instead of a bushing for the pivot post insert a pin-point. I've emailed the author of the original spirograph article requesting clarification about how he made the pin-point pivot. I'll follow up if I get more info. Regarding the "CrowDuck" handle, you are the 1st make mention. It was 'given to me' some 25 years ago by a friend who lived on a native american indian reservation, and it refers to a creature made by the great spirit during the creation. The great medicine man Rolling Thunder disagreed, and said my energy was that of a Bear. CrowDuck |
Author: | Serge Poirier [ Tue Feb 07, 2006 11:21 pm ] |
Post subject: | |
Way to go! Serge the Bear ![]() |
Author: | TonyKarol [ Tue Feb 07, 2006 11:56 pm ] |
Post subject: | |
Now that I see this, I am thinking up new rosette possibilities as well. I also just thought up a way to do this without modding the rosette circle cutter I already have very much a tall. What I am thinking is a second ring, with the diameter sl;ightly bigger than the one the author uses to mark out the 4mm spaced holes. This piece needs two holes, one a 1/4 inch for the main jigs pivot pin, the other 180 degrees away to locate the position of the piece for the pattern - my only hangup is how to secure the second smaller disc to keep the arcs smooth - still thinking .... |
Author: | ggdelazzer [ Wed Feb 08, 2006 1:25 am ] |
Post subject: | |
[QUOTE=Steve Kinnaird] Luigi, do you mean is there any more information on this kind of rosette? I don't know. But it occurs to me that one could vary the spacing of those rotation points, or the diameter of that innermost circle, etc. etc., and get any number of different looks. It would be sort of fun to get out some paper and a compass (the artist's kind, not the mariner's kind) and start sketching some future rosettes. Steve[/QUOTE] Steve I had the answer to my questions; just tried to reduce the diameter of the center pin of my dremel base and had nice results. While doing this I also had some new ideas on different radiuses channels. I'll keep on experimenting and post picks soon. Thanks Luigi |
Author: | Steve Kinnaird [ Wed Feb 08, 2006 5:18 am ] |
Post subject: | |
All you guys are so creative, we want to see some of the designs your fertile brains come up with! Steve |
Page 1 of 1 | All times are UTC - 5 hours |
Powered by phpBB® Forum Software © phpBB Group http://www.phpbb.com/ |